Raspberry PI Installation O.S. Guide to use a iSpindel/Tilt Hydrometer

Here’s my user guide to use your RaspberryPI to follow the fermentation process using a iSpindel/Tilt Hydrometer

What you need ?

Raspberry Pi - Any generation (I’m using the first model release in 2012) or a any Desktop/Laptop
SD Card
SD Card reader
RJ-45 cable
HDMI Cable and monitor/TV
Mouse and Keyboard
USB to Wireless adaptor (if using Gen1 or Gen2)

Step 1 - Download Raspberry Pi - Imager
https://downloads.raspberrypi.org/imager/imager_1.5.exe
Guide : Installing operating system images - Raspberry Pi Documentation
Video : HOW TO INSTALL RASPBIAN OS to your Raspberry Pi with ease - Raspberry Pi Imager
For a Laptop/Desktop : Install Raspberry Pi Desktop on your PC or Mac - Introduction | Raspberry Pi Projects

Step 2 - Start the device with Raspberry PI OS

Connect a mouse and keyboard
Connect the Pi to your router with an RJ-45 cable and connect it to your TV with the HDMI cable

Step 3 - Preparing a device with Raspberry Pi OS for Fermentrack

Ref. : Preparing a Raspberry Pi for Fermentrack — Fermentrack documentation
In order to connect to your device remotely (without having a mouse/keyboard/monitor/RJ45), you have to enable SSH :
In the user interface, start Terminal
In the Terminal, type :

sudo raspi-config
Select option 3 Interface Option
Select Option P2- SSH
Select Enable
Exit the raspi-config

Configure the RaspberryPI OS to use your wireless network :

In the Terminal, type :
sudo nano /etc/wpa_supplicant/wpa_supplicant.conf

In the Network section, type your Wireless SSID and Password :
network={
ssid=“YOUR_WIFI_ID_NAME”
scan_ssid=1
psk=“WIFI_PASSWORD”
}

CTRL-X to save and Exit

Reboot your RaspberryPI :
sudo reboot

While rebooting, disconnect the RJ-45 cable
Locate the IP Address of your RaspberryPI

In the Terminal, type :
arp -a

Take note of the IP address.

Try to connect remotely to your RaspberryPI using Windows 10 Command prompt :
In the Windows Start Menu, type : cmd

In the Command Prompt, type : ssh pi@Your.Raspberry.Pi.IPAddress (use the IP found in the previous command)

Default User : pi
Default Password : raspberry

If you are able to connect remotely, perfect. You can now disconnect the Mouse/Keyboard/HDMI from the Raspberry PI. If not, make sure your SSID is configured correctly and you have the right IP.

Step 4 - Update your Raspberry PI Operating system to the latest version.

pi@raspberrypi:~ $ sudo apt-get update
pi@raspberrypi:~ $ sudo apt-get upgrade

Note : This can take 15 min to 2 hours depending of your RaspberryPI generation

Expand the filesystem to use the totality of the SD Card :

pi@raspberrypi:~ $ sudo raspi-config
Select Option 6 - Advance Options
Selection Option A1 - Expand Filesystem
Exit the raspi-config

Reboot your RaspberryPI :
pi@raspberrypi:~ $ sudo reboot

Step 5 - Installing Fermentrack
Ref. : Installing Fermentrack — Fermentrack documentation

Connect to the Raspberry PI from a Windows 10 Command Prompt

pi@raspberrypi:~ $ curl -L install.fermentrack.com | sudo bash

Installation using the Docker container :
pi@raspberrypi:~ $ curl -L https://raw.githubusercontent.com/thorrak/fermentrack-tools/docker/automated_install/auto-install.sh | sudo bash

Note : Again, this can take 15 min to 4 hours depending of your RaspberryPI generation. Be patient.

Once you see this message, Fermentrack is installed :

Done installing Fermentrack!

You can now access the Fermentrack Website by typing the address provided in the installation log (Fermentrack frontend)

http://x.x.x.x

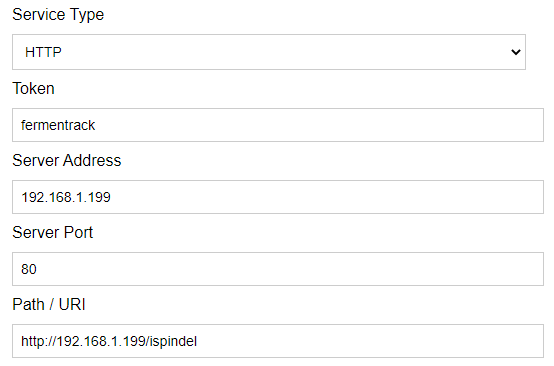
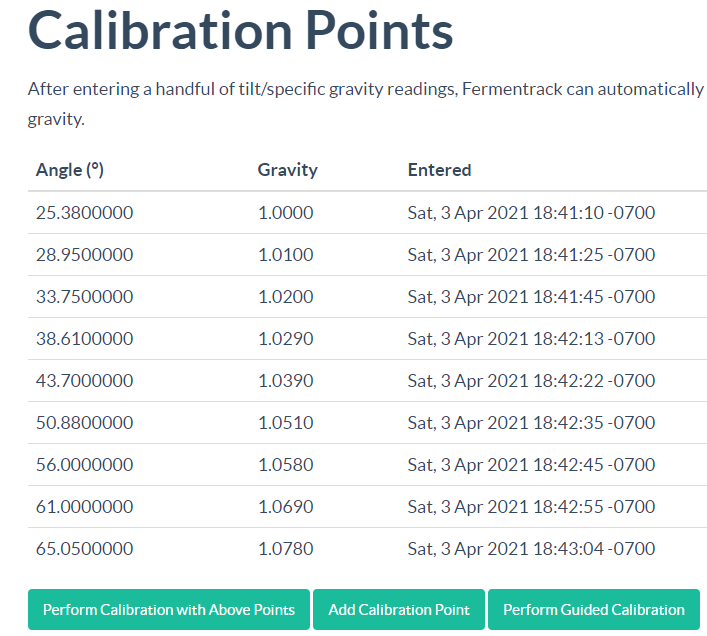
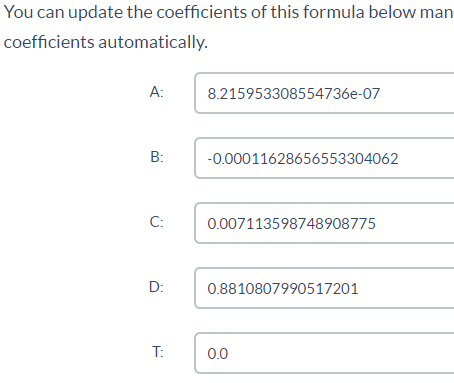
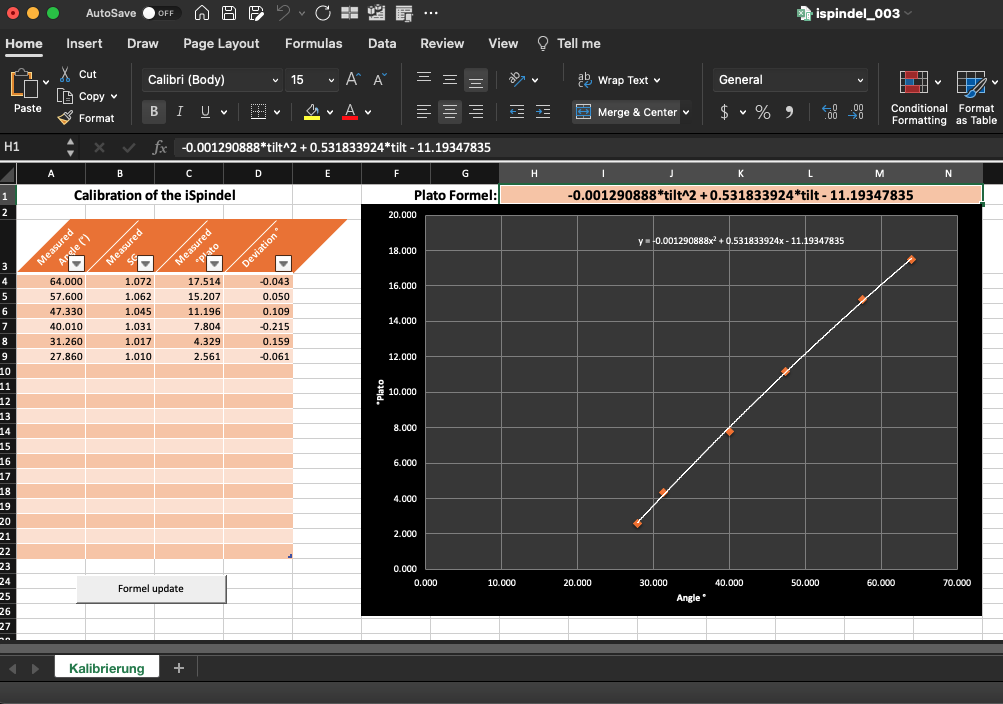
Step 6 - Adding Devices / Gravity Sensors

Ref. : Setting up Fermentrack — Fermentrack documentation

Soon - I will create it once I build my iSpindel

5 Likes

Awesome! Thanks for adding this! I haven’t gone through the steps yet, but will use this when I set mine up.

As a note, I’ve been using my Tilt with Tilt Pi with great success:

Hmmm, interesting. I might buy another SD card and give it a try

Another option is to install Fermentrack using Docker (link). This way you are not limited to using a Raspberry Pi and can use any PC running Linux. Also according to this post, docker will be used for all future releases of Fermentrack.

True. I have a Beelink mini-pc and I’m installing Raspberry Pi Desktop on it at the moment :
Install Raspberry Pi Desktop on your PC or Mac - Introduction | Raspberry Pi Projects

If you don’t want to overwrite the existing Operating System on the computer, you can run the Raspberry Pi on the USB key. When you need it, you boot on the key

Hi guys,

Super interested.

Haven’t tried it yet, but I have a few dozen PI’s around the house for various tasks (home brewed smart home :D).

I just wanted to drop a note that if anyone needs help with a Pi or whatnot, feel free to reach out!

  • Mike
1 Like

Hi Eric, it might be a silly or noob question but does using fermentrack with the iSpindel bypass the need create an account and token with the other Web service mentioned in the iSpindel documentation?

I have a synology nas with docker already installed for other things so I think it could serve versus yet another pi device to manage.

I also don’t own an iSpindel yet and after a quick browsing of the fermentrack documentation, I find it lacking proper information about this specific supported device.

Thanks

Hi Johnny,

I’m only using fermentrack and I configured the token to connect to my fermentrack device.
image

From there, you can push the data to other sites if you like :

Is that answer you question ?

Merci Eric, it helps a lot!

Does the fermentrack app help with the calibration?

Pier-André

Yes, after you provide the entry point :

it will create the Calibration coefficient :
image

1 Like

Est-ce que tu mets à jour la formule de calibration autant dans Fermtrack que dans logiciel du iSpindel ou est-ce que tu entres la valeur de 0 pour un des deux endroits?

non, je le fais seulement dans Fermentrack

Merci @ericpare pour le guide. Tout fonctionne à merveille ! Vive le self hosted !

1 Like

Hi there, is Tilt Pi compatible with the iSpindel? (I guess not)

The tilt is a cool commercial option, how does it compare with the iSpindel, do you have both?

Salut Éric, je fais un test avec mon iSpindel présentement, la personne qui me l’a vendu l’a précalibré. Je n’ai pas retouché la formule dans fermentrack (tout à 0.0) et étrangement la gravité /angle reste toujours à zéro dans le graphique de test.

J’ai l’impression de manquer quelque chose d’évident…

Merci

Est-ce que tu as les valeurs de chaque densité ?

En fait, quand tu dis qu’il l’a calibré, as-tu des valeur quelconque ?

J’ai l’impression qui a fait la calibration du 90 degree dans le iSpindel.

Bonjour Éric, j’ai un export des valeurs dans Excel avec la formule aussi mais lorsque je rentre les valeurs dans le menu de calibration de fermentrack, la formule résultante est très différente. C’est ce qui m’embête un peu, je crois avoir vu une formule directement dans le iSpindel lorsque j’ai ajouté mes informations de wifi, device name et destination des données.

J’ai l’impression que les deux pourraient entrer en conflit mais je ne suis pas certain de mon coup.

Quelque chose qui resemble à ceci ?

Degree 1: 0.9551843429613254 + 0.0018776737079091383 *tilt
Degree 2: 0.9455717324662616 + 0.002344296040996632 *tilt-0.0000051621235269529215 tilttilt
Degree 3: 0.8805164543759484 + 0.007150241574385149 *tilt-0.00011705278827049918 tilttilt + 8.267797141723451e-7

Bonjour Éric, voici ce qui m’a été partagé précisément.