After the beer exchange and drinking a lot of good, well carbed beer with no residue in the bottle, I’m looking to make the switch from bottle conditioning. I’ve read a lot of mixed reviews on both CPF and Beer gun style fillers.
I’m using an old Melvico prototype that was built back in 1995. It still works although it doesn’t have a gauge on it.
If you were to look at the parts, you might think: “Hell, I can build one of those.” Which is pretty much what I say when I see all the others on the market.
You basically need three ball valves: One for the gas in, one for the beer in and one overflow/release.
You start by hooking up the same CO2 source to the keg you want to bottle from and the gas in of the filler.
You then purge the bottle by letting in CO2 and letting “air” come out the release. After a few seconds, you close the release until the bottle is under pressure. You then close the CO2 and open the beer in valve while slowly releasing pressure. The bottle (hopefully) fills with very little head until full. You then release slowly all the pressure and cap immediately.
I’ve had mixed results in fill level but I’ve enjoyed beers, especially stronger beers, a long time after bottling.
I made the switch from a counter-pressure filler to a second hand 1st generation blichman beer gun in the fall (nearly identical to the link you shared). Bottling remains a labour intensive experience but I do prefer the beer gun now that I’m used to it. Both tools have given good results. I haven’t tried it on any long term storage beers yet. Purging of the bottles is largely the same between the two models, so I don’t expect a significant difference in final result.
If you happen to be interested in my counter-pressure filler, I’d be happy to sell it for $40 (was around $80 new at the time).
Like @DenisB, I’m using something similar to this : Counter Pressure Bottle Filler | MoreBeer
and it is working great for me. It’s even better if you have a second CO2 tank to avoid moving your only tank around.
I bought it at Choppe à Barrock.
I fill my bottles straight from the tap, no beer gun. The beer flow has to be gentle and the bottle tilted has much as possible. The bottle must have a little residual rinsing water in it to minimize foaming. Cap on foam.
My goal is to keep for 2-3 months. I brew my lagers in the winter and want to bottle them before my cold room warms up but not necessarily drink them before summer.
I don’t know, maybe this only happened to me. Last summer I bottled a bunch of APAs using a growler filler without purging the bottles with CO2. I found the beers rapidly lost their hoppy flavour, much faster than when I used my bottle filler. This seemed like the only real variable so I decided at that point that it wasn’t worth it to rush bottling and now only use a bottle filler in purged bottles.
Yeah you guys are right, my method is ok for short term bottling but I would not recommend it for any long term bottle conservation, especially for hoppy beers.
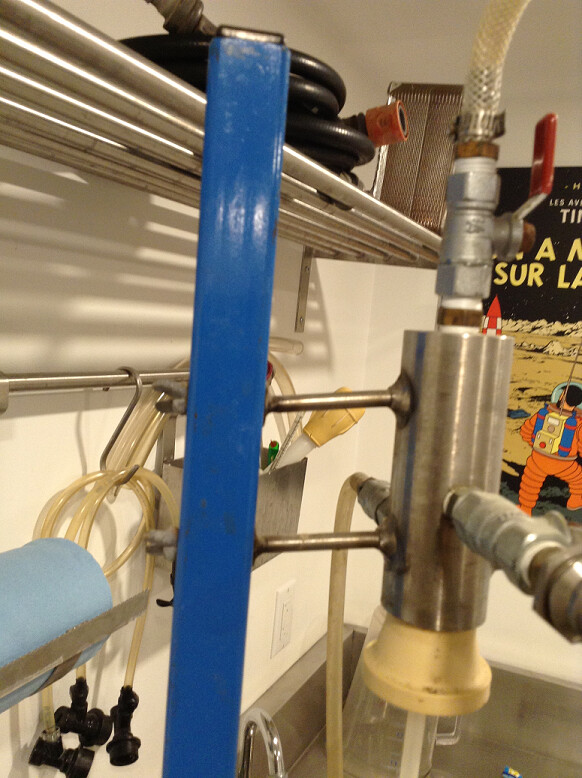
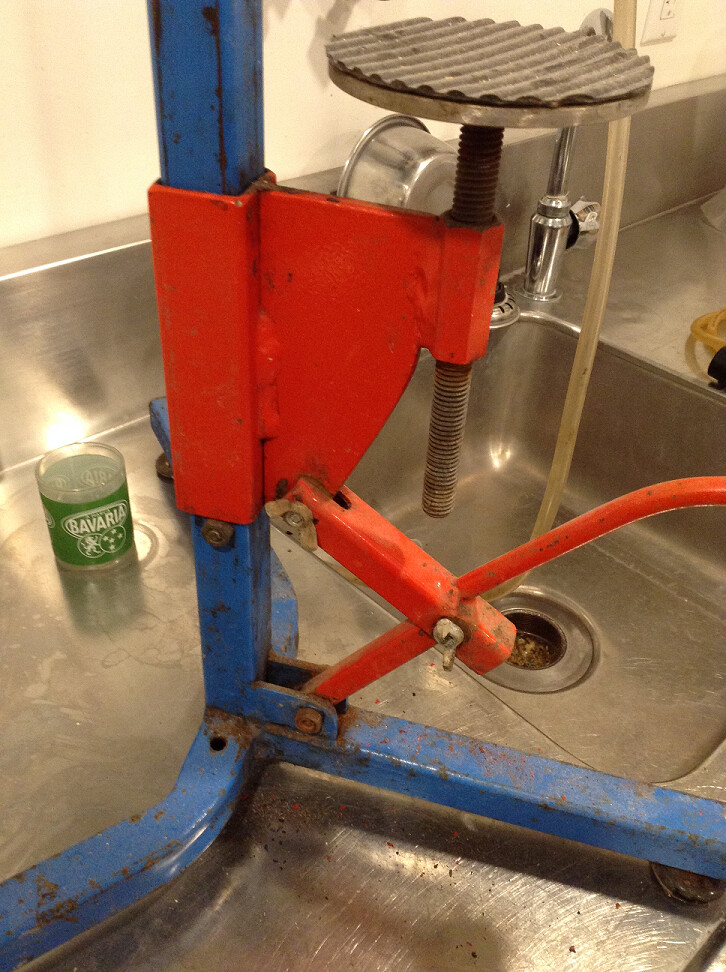
While looking for something else today, I found some close-ups of my counter pressure filler that I took last year when I took the thing apart to repaint it since it had become quite rusty from sitting around. I took the pictures so that I knew how the whole thing went back together again.
I don’t have an overall picture. One of these is of the “head” which has the valves for gas (foreground), beer (top) and release (far side).
The other one is the base that is adjustable according to the size of bottle and the lever that you lower which raises the base and presses the bottle top against the rubber for a tight seal.
Denis, that’s a cool piece of engineering. I imagine there is one ball valve for each of the gas , liquid and purge lines? The lifting mechanism is the coolest part. I was thinking of using a counter weight to lift and lower a bottle carriage but the system on yours is much simpler.
You’re correct about the ball valves; you just can’t see them on the photo. Between the lifting system and the adjustment screw on base, this fits pretty much any size bottle I’ve encountered.
I’ve got a counterpressure bottle filler that I made a while back and never got around to using. The bungs are kind of dry now, but you are more than welcome to have it if you’d like!
Like @DenisB I to have a Melvico, it’s a great filler if you have a keg to bottle up otherwise its a lot of setup just for a few bottles. I don’t know if anyone has mentioned it but if you have Perlick taps there is a fill tube you can get that quickly connects to the tap to fill a bottle. Great for filling a few bottles for a BBQ or a meeting.
The Melvico in action. https://drive.google.com/file/d/1WR6tmtC1rgbGu4SVXVFHReGkxTnEmLKs/view?usp=sharing
To simplify bottling from a keg (not having to unhook the keg and being able to keep the fridge door closed) I’ll be picking up one of these Intertap connections on my next equipment order: